English
 Español
Comunicação entre 2 ESPs8266 Ponto a Ponto – Peer-to-Peer – Sem Roteador
Olá a Todos!
Comunicação e Controle entre Dois ESPs8266 Ponto a Ponto – Peer-to-Peer
No post de hoje, faremos a mesma comunicação entre dois ESP8266, no entanto, não utilizaremos o Roteador para executar essa comunicação, um dos ESPs irá ser uma AP Access Point no modo STA Station, que será o Servidor e receberá a conexão do Client.
Você pode se interessar também!
- Unit DualMCU: A Poderosa Placa de Desenvolvimento com ESP32 e Raspberry Pi RP2040!
- Controlando LEDs com dois ESP8266 utilizando Protocolo ESP-NOW
- Como Ler Valores Analógicos ADC Usando NodeMCU ESP8266 – IDE Arduíno!
- Como Hackear Circuito Módulo Relé para funcionar com ESP8266 & ESP32 com 3.3V
- Como utilizar o Botão Flash do NodeMCU ESP8266
- Piscando LEDs Independentes sem delay() utilizando Função millis()
- Alarme de Segurança com Sensor PIR e ESP8266 – Sensor de Movimento
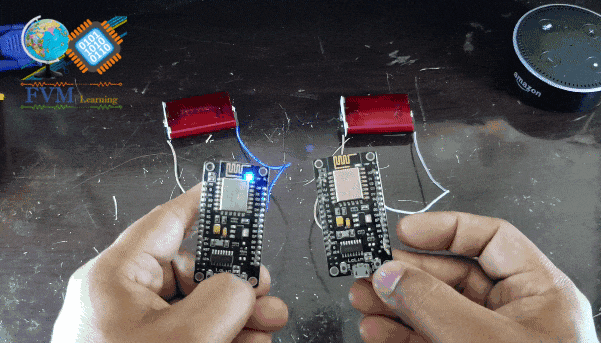 |
| Fig. 1 – Comunicação entre 2 ESPs8266 Ponto a Ponto – Peer-to-Peer – Sem Roteador |
FUNCIONAMENTO
Parâmetros do Código!
#define       LedBoard  2                    // WIFI Module LED
#define       BUTTON    0                    // NodeMCU Flash-Button
Logo após no Void Setup, definimos os Pinos com a função pinMode para o led com OUTPUT e o botão definimos com a função INPUT_PULLUP, isso faz com que o ESP8266 utilize o resistor de Pull Up interno do Microcontrolador, como podemos visualizarmos no código abaixo.
  pinMode(LedBoard, OUTPUT);
  pinMode(BUTTON, INPUT_PULLUP);
Sendo assim, o Cliente envia um comando através da chave “Flash-Button” para o Servidor, e quando o Servidor receber esse comando através da própria conexão Wi-Fi que ele fornece, ele ligará a carga definida, “que utilizamos o LED embarcado como exemplo”.
Se você já instalou, proponho prosseguirmos…
Os Códigos
Logo abaixo temos os códigos tanto do Server, que é um AP – Access Point, e Station, quanto do outro ESP no modo STA – Station, ambos seguem os mesmos princípios,
Server_Comunic_ESP_P2P_No_Router
Client_Comunic_ESP_P2P_No_Router
//==================================================================================// // CLIENT // // Communication Between 2 ESPs8266 Peer-to-Peer - No Router // // Adapted by: Engineer Jemerson Marques, On: 21.09.2019 - FVM Learning website // // Available at: https://www.fvml.com.br and on Youtube channel // // https://www.youtube.com/c/FVMLearning - I hope you have fun - Good luck // //----------------------------------------------------------------------------------// //------------------------------------------------------------------------------------ // Libraries Needed For This Project //------------------------------------------------------------------------------------ #include <SPI.h> #include <ESP8266WiFi.h> // The Basic Function Of The ESP NODEMCU //------------------------------------------------------------------------------------ // Defining I/O Pins //------------------------------------------------------------------------------------ #define LedBoard 2 // WIFI Module LED #define BUTTON 0 // NodeMCU Button //------------------------------------------------------------------------------------ // WIFI Authentication Variables //------------------------------------------------------------------------------------ char ssid[] = "FVML"; // SSID of your ESP Server char pass[] = "fvml1234"; // password of your ESP SEVER //------------------------------------------------------------------------------------ // WIFI Module Mode & IP //------------------------------------------------------------------------------------ IPAddress server(192,168,10,40); // the fix IP address of the server WiFiClient client; //==================================================================================== void setup() { pinMode(LedBoard, OUTPUT); // Initiate the Onboard Led Output pinMode(BUTTON, INPUT_PULLUP); // Initiate the ESP Pin: INPUT_PULLUP - Its mean that you no need put a resistor digitalWrite(LedBoard, HIGH); // Initiate the Onboard Led Off Serial.begin(115200); // only for debug Serial.println(""); Serial.print("Awaiting connection: "); WiFi.begin(ssid, pass); // connects to the WiFi router while (WiFi.status() != WL_CONNECTED) { Serial.print("."); digitalWrite(LedBoard, LOW); delay(250); digitalWrite(LedBoard, HIGH); delay(250); } digitalWrite(LedBoard, HIGH); //------------------------------------------------------------------------------------ // Network parameters - Only for debug //------------------------------------------------------------------------------------ Serial.println(""); Serial.println("ESP Client Connected - FVML"); Serial.print("IP: "); Serial.println(WiFi.softAPIP()); Serial.print("SSID: "); Serial.println(WiFi.SSID()); Serial.print("Signal: "); Serial.println(WiFi.RSSI()); } //==================================================================================== void loop() { ContinuousConnection(); } //==================================================================================== void ContinuousConnection(){ client.connect(server, 80); // Connection to the server ReadButton(); // Read Button from Transmitter } //==================================================================================== void ReadButton() { int reading = digitalRead(BUTTON); // Read the Button State if (reading == LOW) { // If the button pressed client.print("I am Transmitterr"); // Send messege "I am Transmitter" To Server delay(200); }else{ ClientContinue(); } } //==================================================================================== void ClientContinue(){ client.println("Transmmiter"); // sends the message to the server String answer = client.readStringUntil('r'); // receives the answer from the sever client.flush(); if (answer == "I am Receiver") { // compares if the response of the receiver is equal to 'I am Receiver' digitalWrite(LedBoard, !digitalRead(LedBoard)); // if it changes the status of the LED Serial.println("Data Received: " + answer); delay(200); // client will trigger the communication 200 milliseconds } } //============================================== www.fvml.com.br =============================================================
ARQUIVOS PARA BAIXAR:
Você também pode baixar os arquivos (.ino) do código de programa no link abaixo:
Fizemos um vídeo no nosso canal do YouTube com esse tutorial passo a passo, e você também pode assistir abaixo, ou ir direto para nosso canal no YouTube!